Manhattan Bathroom Renovation: Rules, Permits, Costs, and What It Really Takes

Manhattan Bathroom Renovation: What It Really Takes — From Permits to Plumbing to Final Tile
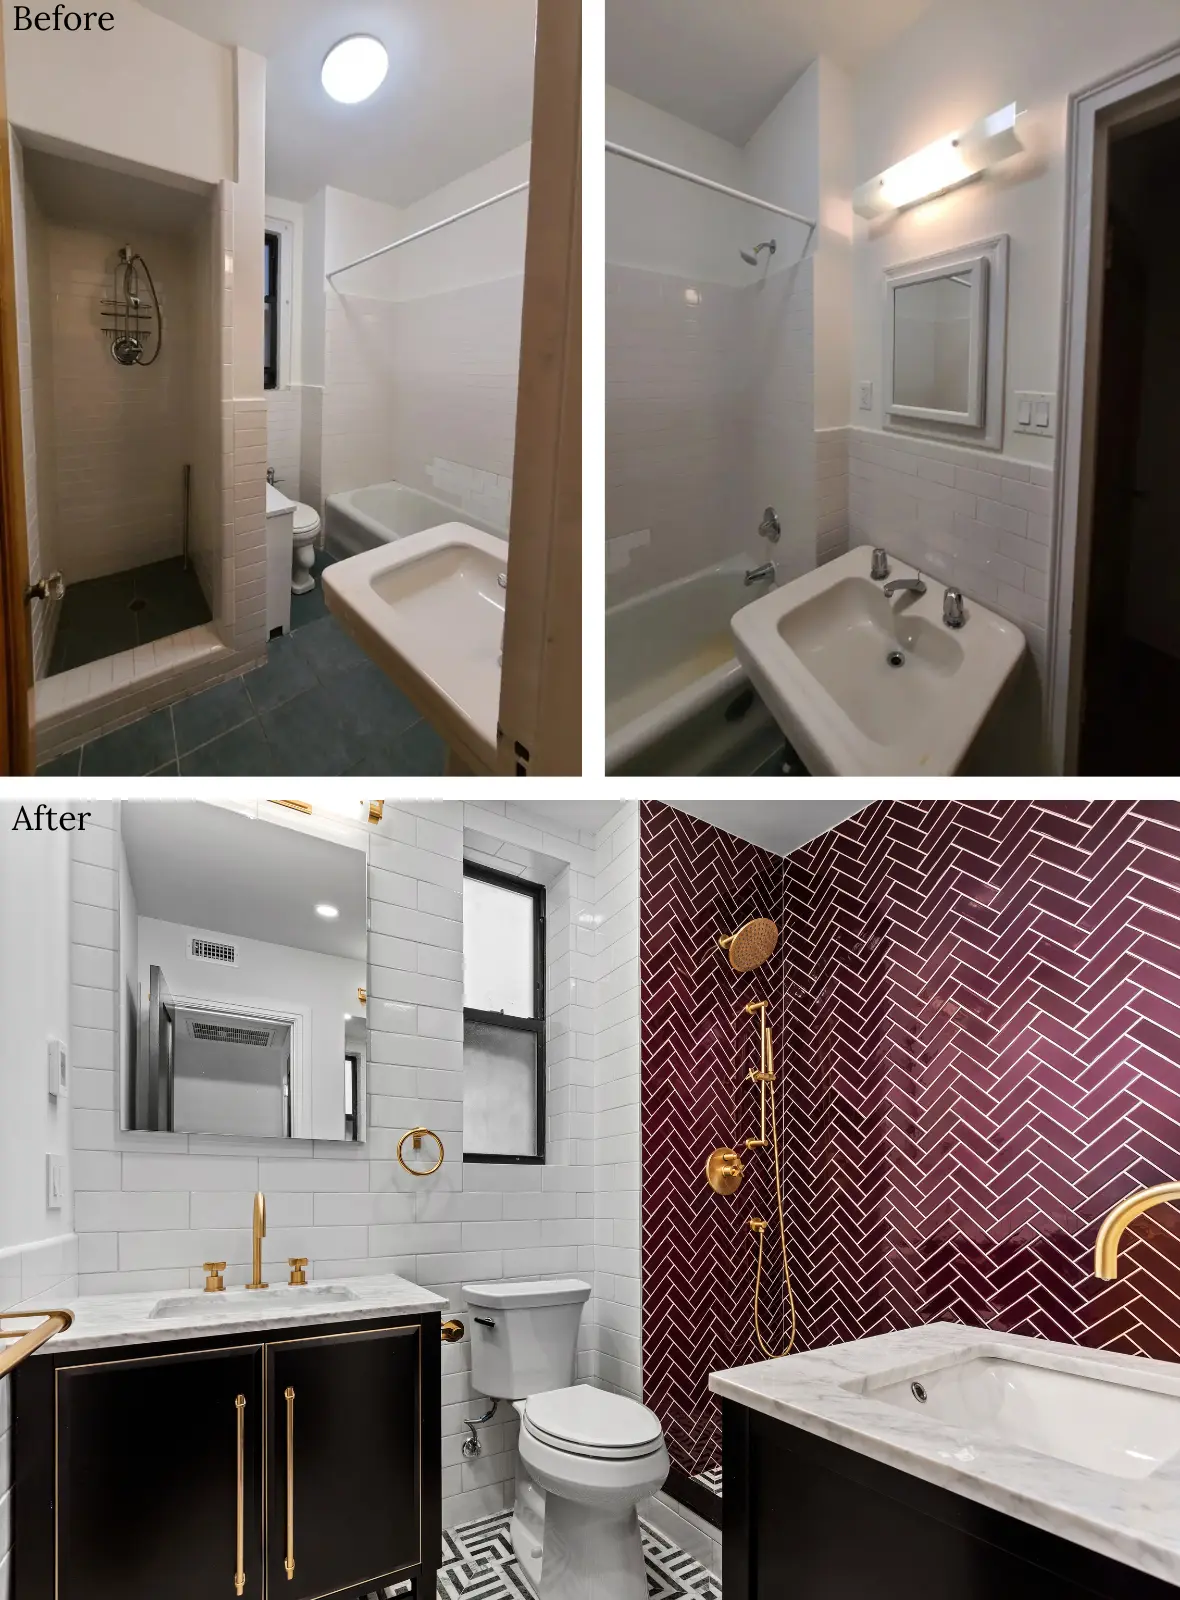
If you’ve been living with a cramped layout, a tub you never use, or a bathroom that just feels dated, you’ve probably thought about what a real bathroom renovation would involve. Not a refresh — a full gut. New layout, new plumbing, proper waterproofing, the finishes you actually want.
Here’s the honest answer: a bathroom renovation in Manhattan or Brooklyn is one of the most complex residential projects you can take on in New York City. The rules are layered, the building systems go deep, and the approvals can involve your co-op board, your building’s engineer, and the Department of Buildings — sometimes all three.
But it’s also completely manageable when you understand what’s involved from the start. This guide by Star Renovations NY walks you through every phase of a real bathroom renovation in NYC — gut demolition, plumbing back to risers, waterproofing, reconfiguration, tub-to-shower conversions, adding a washer/dryer, permits, approvals, and cost — so you can plan with confidence and avoid the surprises that slow projects down.

Phase 1: Gut Demolition — What “Starting From Scratch” Actually Means
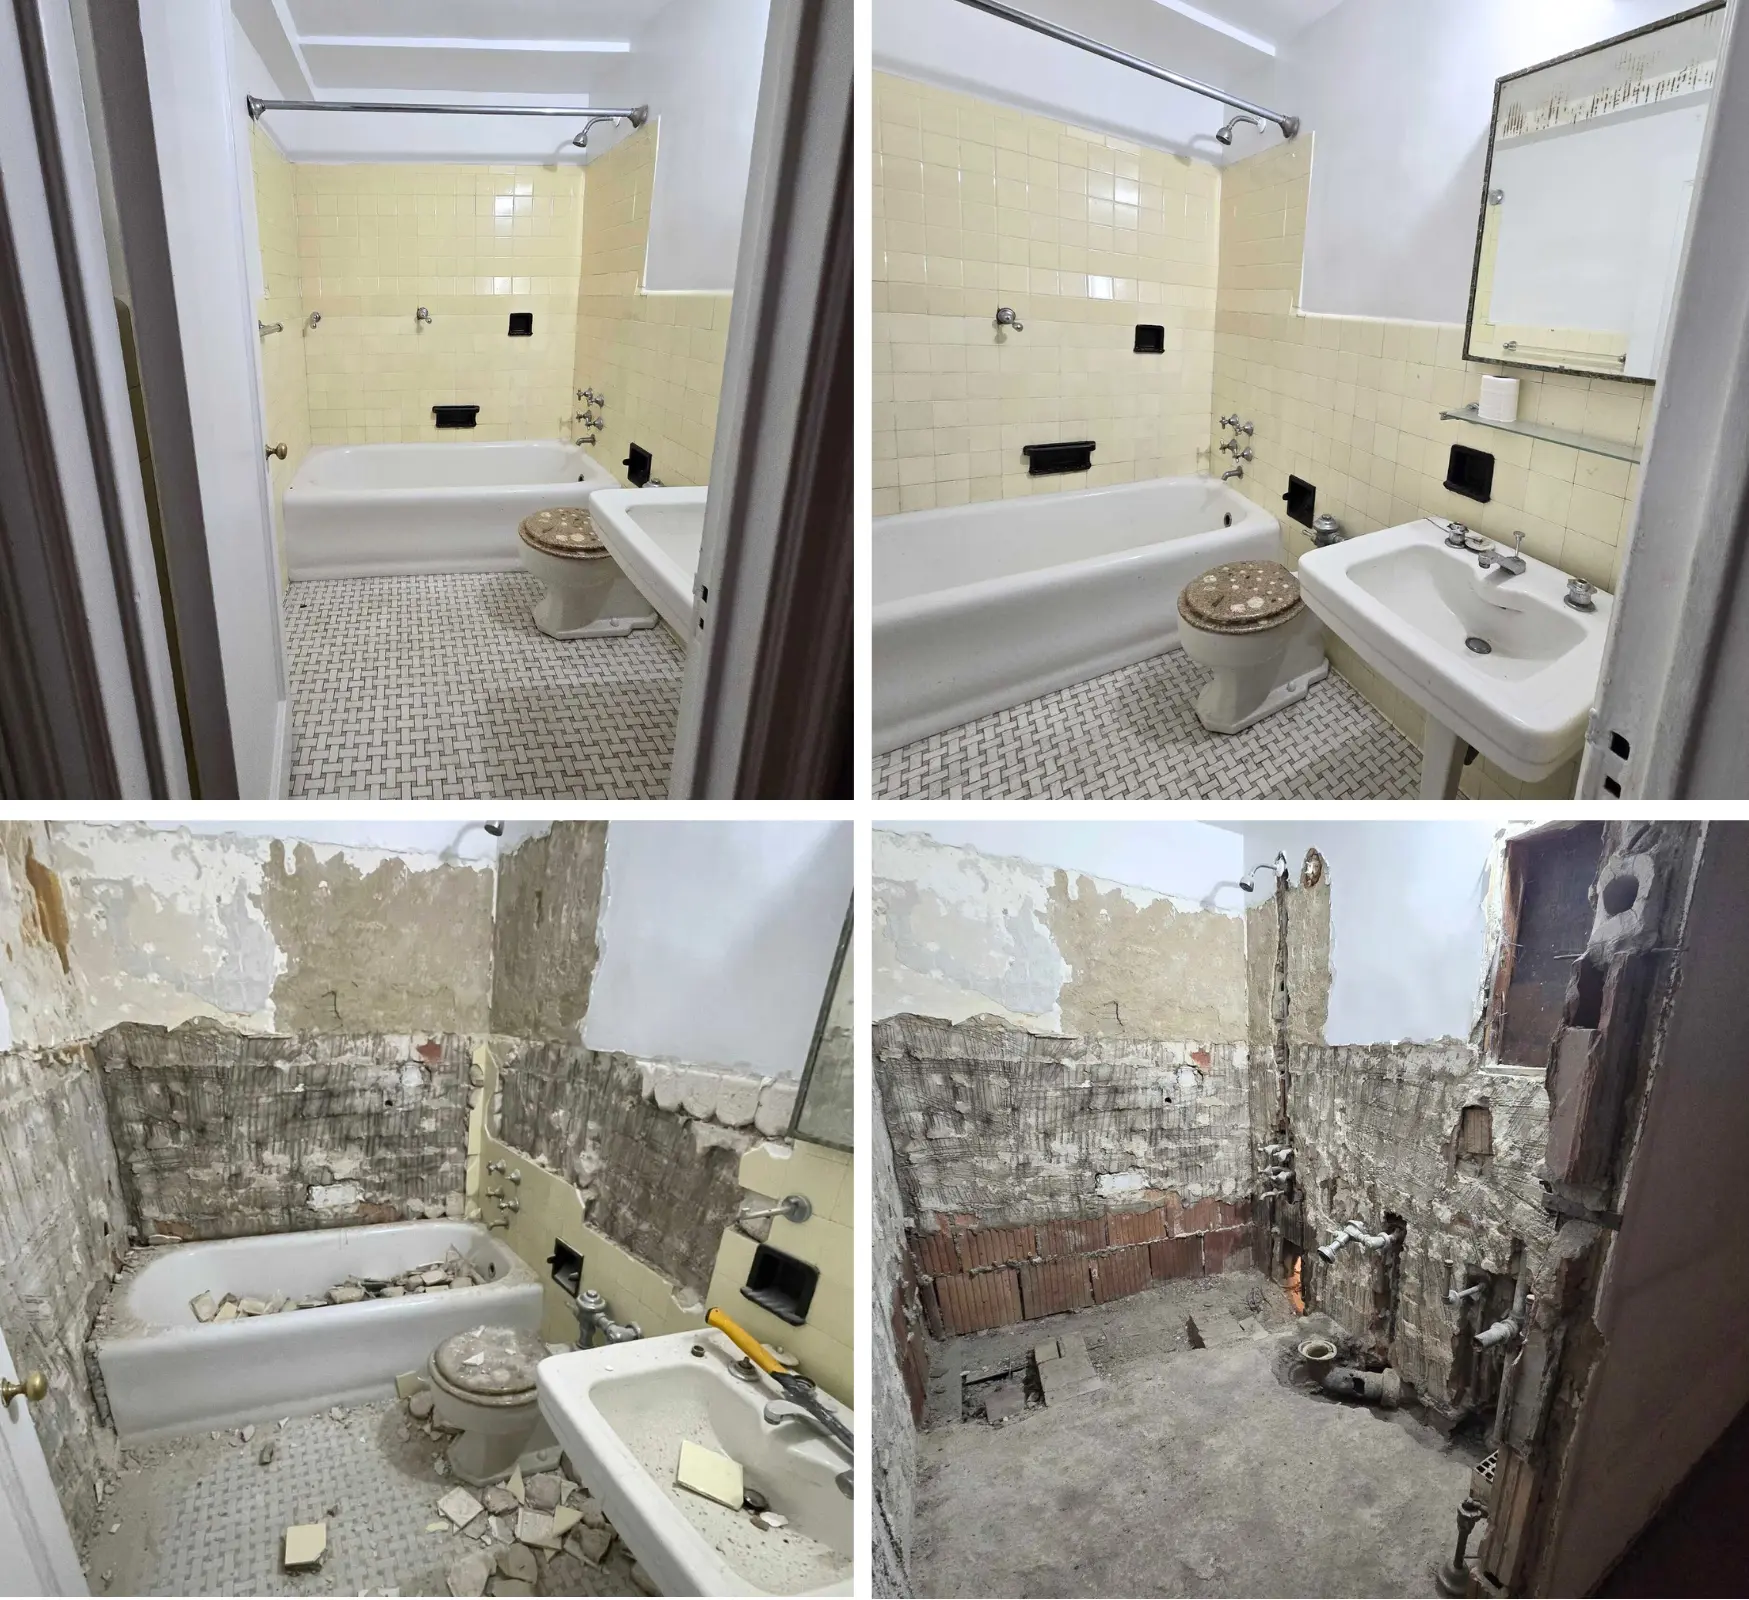
When we talk about a bathroom gut renovation in NYC, we mean stripping the space down to the studs and subfloor. Every surface you see — tile, drywall, fixtures, vanity — comes out. What you’re left with is the raw structure of the room, which is exactly what you need to do the job right.
Why go that far? Because a cosmetic overlay on top of old plumbing and poor waterproofing is just a prettier version of the same problem. Moisture finds its way in. Pipes from the 1940s fail. Layouts that were never right don’t get better with a coat of paint.
During gut demo, our crew also opens up walls and the ceiling where needed to expose the plumbing stack, drain lines, and vent pipes. In most Manhattan pre-war buildings, those systems haven’t been touched in decades — and seeing what’s actually there is what makes the rest of the plan realistic.
What’s Typically Discovered During Demo
- Cast iron drain lines that are cracked, corroded, or misaligned
- Galvanized supply pipes with heavy mineral buildup reducing water pressure
- Missing or failed waterproofing membranes behind original tile
- Subflooring with water damage from slow leaks over many years
- Venting that was never properly connected or has separated from the stack
None of this is unusual in NYC apartment buildings. It’s why a gut renovation — rather than a surface-level remodel — is the right approach for any bathroom you want to last.
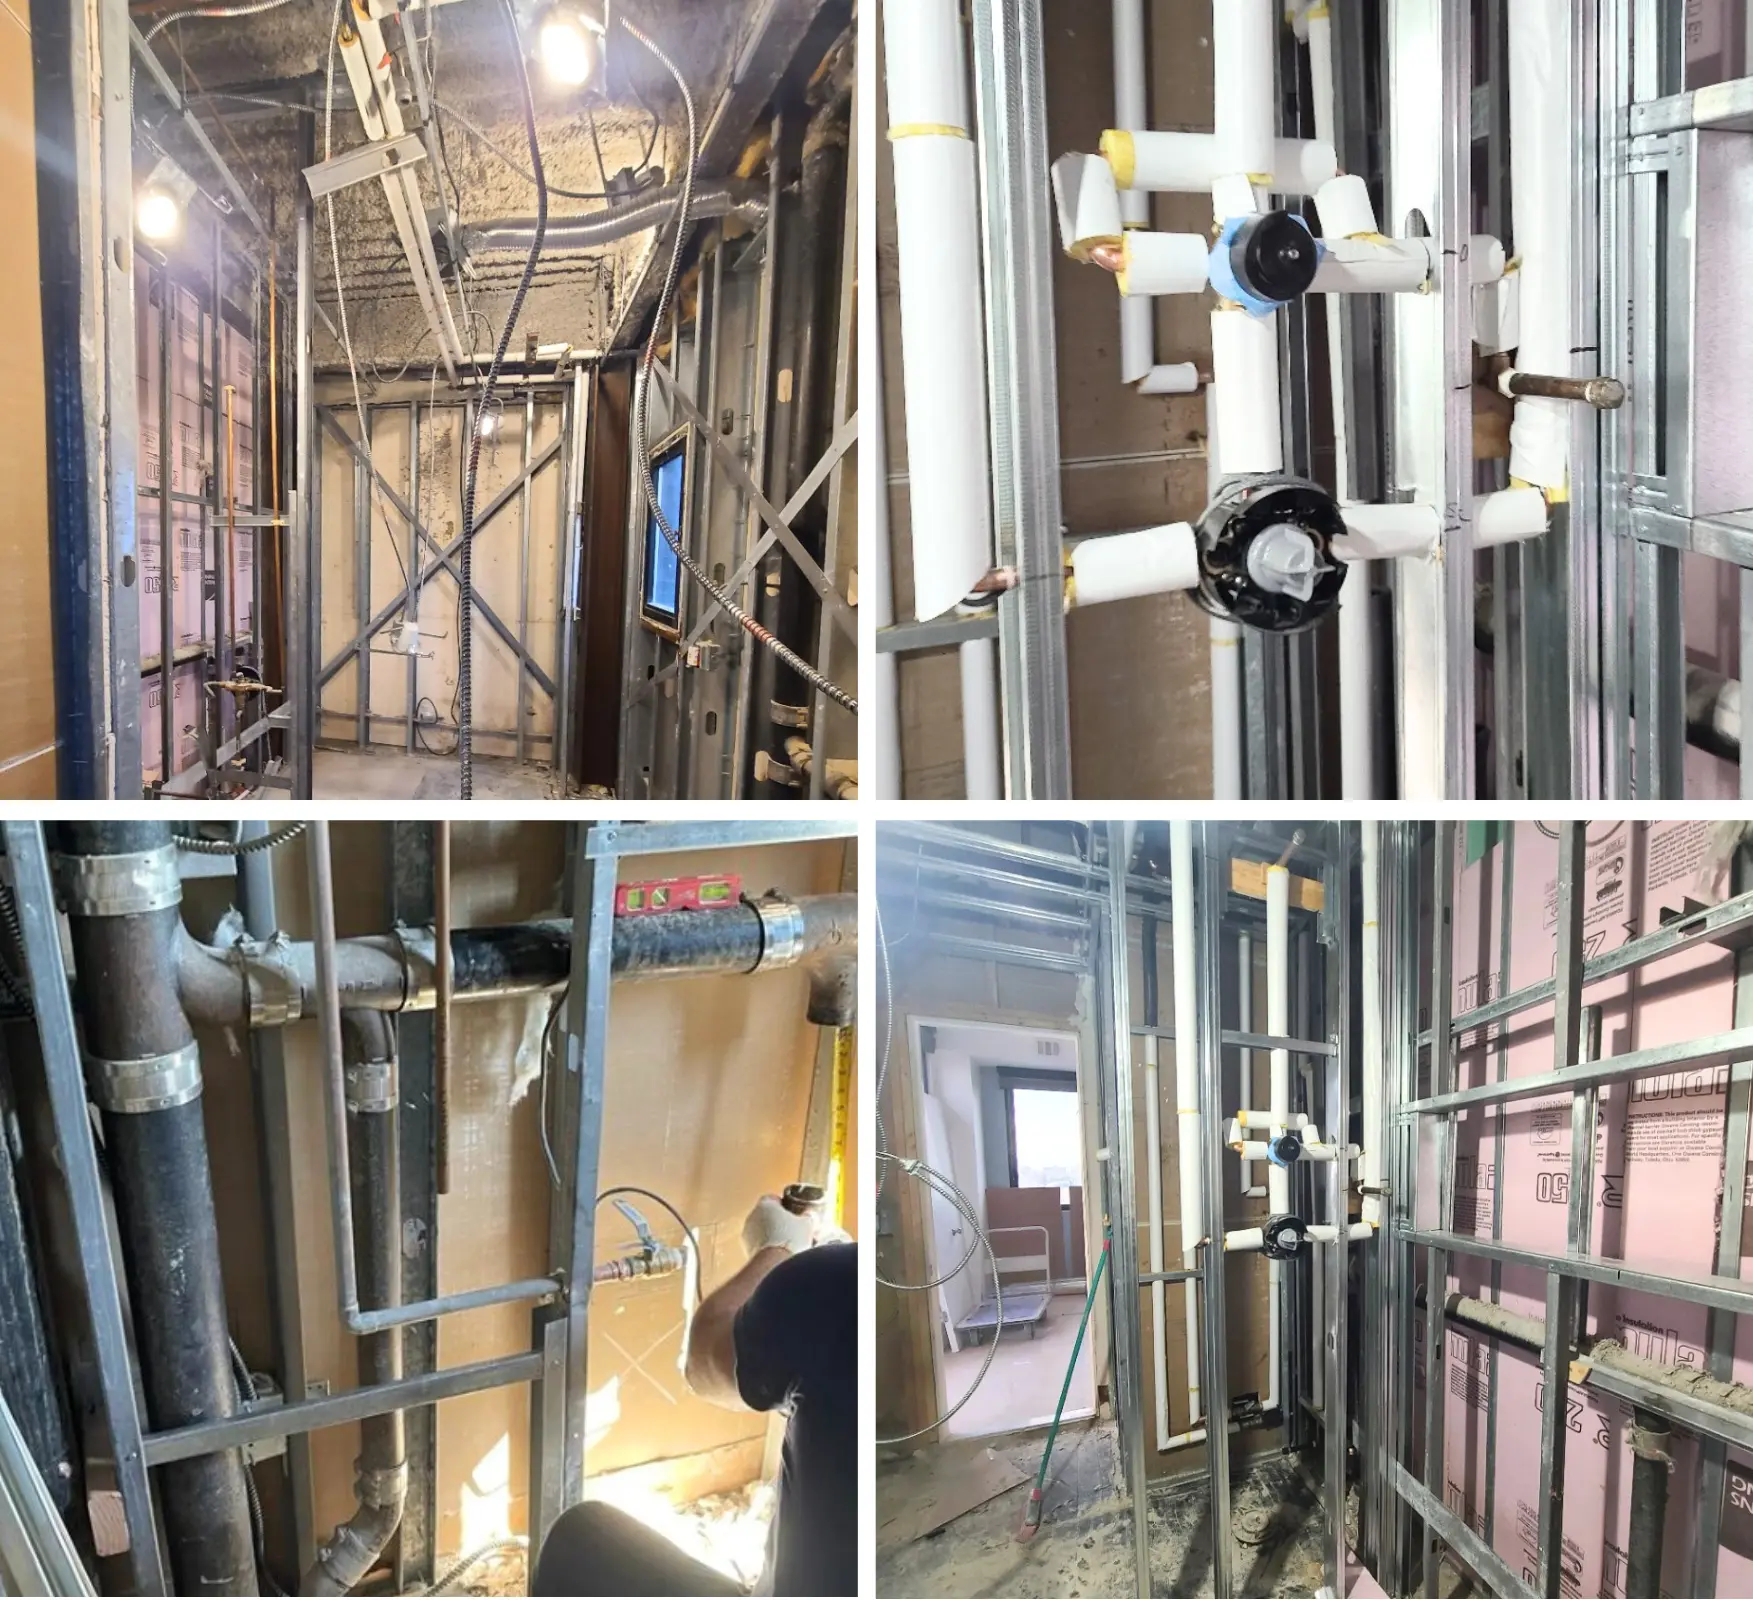
Phase 2: Plumbing — Back to Risers, New Supply, New Drain
Plumbing is where a Manhattan bathroom renovation gets technically complicated — and where the difference between a real renovation and a band-aid becomes clear.
Every fixture in your bathroom (toilet, shower, tub, sink) connects back to your building’s plumbing riser system: vertical pipe stacks that run floor-to-floor through the building. The waste riser carries drain water down. The supply risers bring hot and cold water up. The vent stack equalizes pressure so drains flow properly.
In a gut renovation, the goal is to replace all the horizontal branch lines that run from the risers to your fixtures, using modern materials that meet current NYC plumbing code — typically PVC for drain and vent lines and copper or PEX for supply.
What “Back to Risers” Involves
- Cutting new drain lines from each fixture back to the waste stack, properly sloped for drainage
- Replacing galvanized or corroded supply branches with copper or PEX
- Extending or reconfiguring vent lines to serve new fixture locations
- Installing new shutoff valves at every fixture for future serviceability
- Coordinating with building staff for the water shutoff window during tie-in work
Riser Constraints That Shape Layout Decisions
One of the most important early conversations in any bathroom renovation planning process is where the riser is, and how far you can realistically move fixtures from it. Moving a toilet too far from the waste stack creates drainage slope problems. Relocating a shower or tub significantly can require re-routing drain lines through the floor, which may require your neighbor’s ceiling — triggering board notification or approval.
A good design-build team surveys riser locations during the earliest site visit and uses that information to shape the layout, not fight it. You may not be able to put the toilet exactly where you imagined, but working within those constraints intelligently is how you get a great result without extended delays or board pushback.
Phase 3: Waterproofing — The Step That Protects Everything Else
Waterproofing is the most consequential step in a bathroom renovation, and also the one that gets skipped most often in lower-quality work. You’ll never see it when the job is done. But if it’s done wrong, you’ll know within a few years — through water damage in the unit below, moisture behind your tile, or mold behind a vanity.
In New York City, co-op and condo boards often require documentation of waterproofing systems as part of the alteration agreement approval process. That’s not bureaucracy for its own sake — it’s protection for your neighbor’s unit directly below yours.
What Proper Waterproofing Covers
- Full shower walls and floor pan, typically using a sheet membrane or liquid-applied system (WEDI, Schluter, RedGard are common)
- The subfloor in the wet zone, including under the toilet flange and around the tub
- All curb transitions, corners, and penetrations — these are where failures start
- Mud bed or mortar base under floor tile in wet areas to ensure slope to drain
The standard in luxury bathroom renovation is to treat the entire floor as a wet zone, not just the shower stall. That means full-coverage waterproofing membrane under all tile, not just the areas directly hit by water. It’s a more conservative approach that meaningfully extends the life of the renovation.
Phase 4: Layout Reconfiguration — How Far Can You Go?
One of the most common questions homeowners ask before starting a bathroom renovation in Manhattan is: can I change the layout? Can I move the toilet? Can I expand into the adjacent closet? Can I combine two small bathrooms into one?
The answer is almost always “it depends,” and it depends on three things: your building’s wet-over-dry rules, the location of your plumbing risers, and your co-op or condo board’s alteration agreement.
For more Bathroom renovation rules and approvals read our latest blog post https://srny.nyc/blog/manhattan-bathroom-renovation-rules-approvals-real-costs
Wet-Over-Dry Rules
Most Manhattan co-ops and many condos prohibit “wet” spaces (bathrooms, laundry) from sitting directly over “dry” spaces (bedrooms, living rooms) in the unit below. This is a building policy, not a city code — but it’s often strictly enforced.
If the closet you want to annex into your bathroom sits above a neighbor’s bedroom, the expansion is likely off the table. If you want to convert a powder room to a full bath and the floor below is a living area, that may be restricted too. Your alteration agreement and existing floor plans will tell you the boundaries of your wet zone before you fall in love with a layout that won’t get approved.
What Reconfiguration Can Realistically Achieve
- Rotating the toilet orientation to gain clearance
- Expanding the shower footprint by removing a tub
- Relocating the vanity to an adjacent wall for better natural light or flow
- Adding a double vanity in a master bath with sufficient width
- Creating a separate wet room or walk-in shower with frameless glass
- Combining a narrow second bathroom with an adjacent closet (within wet zone limits)
Even within constraints, there is usually meaningful room to improve how the space flows and functions. The key is understanding the real boundaries early, designing to maximize them, and not wasting time on layouts that will never clear board review.

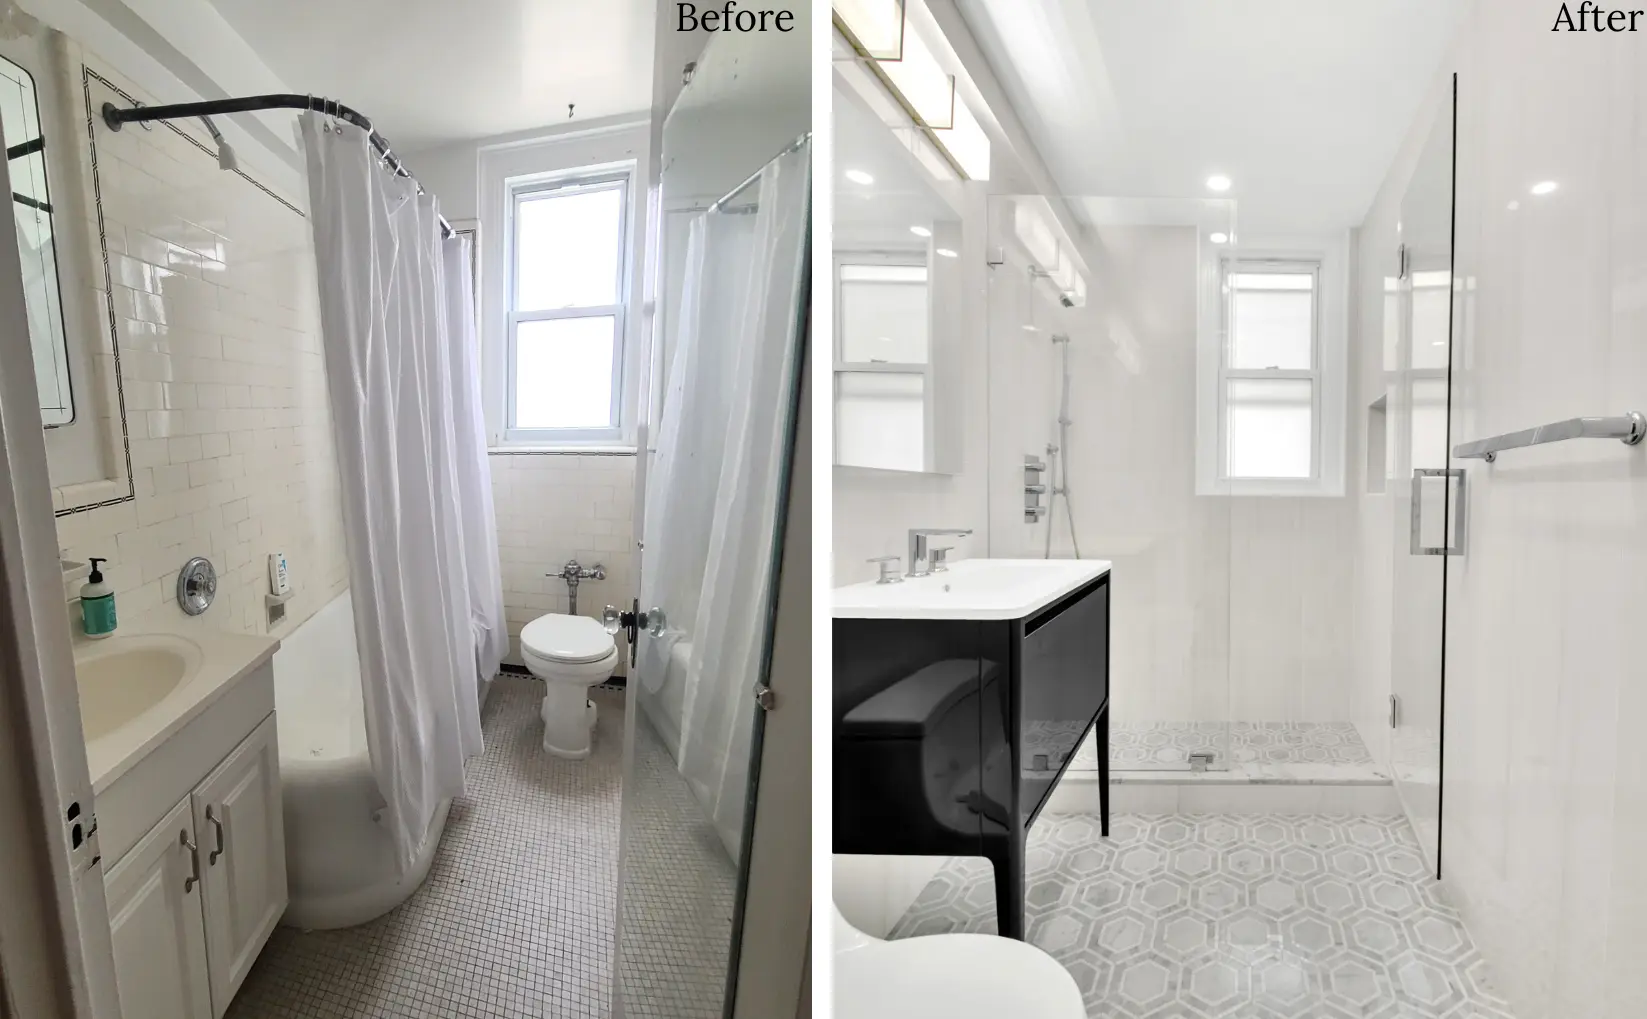
Phase 5: Tub-to-Shower Conversion in NYC
Converting a bathtub to a walk-in shower is one of the most requested changes in Manhattan bathroom renovations — and one of the most impactful. A well-designed walk-in shower with large-format tile, a frameless glass enclosure, and a ceiling-mounted or linear drain immediately transforms the feel of a bathroom from functional to spa-like.
But in New York City co-ops and condos, tub-to-shower conversions often require board approval, particularly when it’s the only tub in the unit. Many co-ops have rules requiring at least one bathtub per unit, especially in buildings where families or future resale value is a consideration.
What to Expect From a Tub-to-Shower Conversion
- Board notification or approval if it’s your only tub
- New drain rough-in, properly sloped and waterproofed
- Shower pan system (linear drain or center drain), mortar bed, waterproofing membrane
- Wall tile from floor to ceiling, with properly specified grout and setting materials
- Frameless glass door or partition — custom measured after tile is set
- Niche, bench, or built-in storage planned during framing stage
- Thermostatic or pressure-balance valve to meet NYC plumbing code
A tub-to-shower conversion done properly is a gut-level project, not a surface swap. The plumbing rough-in changes, the waterproofing goes in from scratch, and the tile installation requires skilled labor and high-quality materials if it’s going to hold up and look right in a high-end home.
Phase 6: Adding a Washer and Dryer to Your Bathroom in NYC
Adding laundry — particularly a washer/dryer combo unit or a stacked washer and dryer — inside an apartment bathroom or adjacent to it is one of the most complex upgrades in NYC renovation work. It involves plumbing, electrical, ventilation, and almost certainly board approval. But when it’s done right, it’s one of the highest-value improvements you can make to a Manhattan apartment.
Learn more about adding a washer and dryer in a NYC apartment gut renovation https://srny.nyc/blog/add-a-washer-and-dryer-with-a-nyc-apartment-renovation
What’s Required to Add Laundry
- Co-op or condo board approval — required in virtually every building; some co-ops prohibit it entirely
- Cold water supply line to the washer location, with proper shutoff
- Drain connection — must tie into your existing waste line with proper trap and air gap
- Venting for the dryer — electric ventless (condensing or heat pump) dryers are the most practical in apartments since they don’t require an exterior duct run; gas is generally not permitted
- Dedicated 240V electrical circuit for most dryers; washer typically on a dedicated 20A circuit
- Flood stop valve — required by many buildings to protect against washing machine hose failures
- Leak pan under the washing machine
Building Restrictions to Know
Many Manhattan co-ops have explicit rules about laundry installation: allowable machine types, required shutoff locations, drainage requirements, and noise mitigation. Some require a pan under the washer with a drain connection. Others require the flood stop device to be wired into the building’s monitoring system.
Understanding your building’s specific requirements before specifying equipment saves significant time. The alteration agreement and house rules are the starting point. A pre-application conversation with your managing agent can clarify what’s been approved in the past and what documentation the board will want.
.webp)
Phase 7: Floors and Walls — The Finish Work That Makes It Real
Everything up to this point — demo, plumbing, waterproofing, electrical — is infrastructure. Important, essential, invisible. The floors and walls are where the design vision becomes a physical reality.
In a luxury bathroom renovation, floor and wall selection decisions start early, not at the end. Large-format stone or porcelain tile (24x48 or larger) requires a flat, deflection-resistant subfloor — which is why the mortar bed (Mud job) and subfloor work during rough stages matters so much. Book-matched marble slabs for a feature wall need to be selected, sequenced, and ordered before tile work begins.
Floor Considerations
- Large-format tile requires skim coat leveling and anti-fracture membrane under the setting bed
- Heated floor (electric mat or hydronic) is roughed in before the mortar bed or substrate layer
- Slip rating matters: DCOF ≥0.42 required for wet floor surfaces per ANSI standards
- Grout selection — epoxy grout for wet areas offers better stain and moisture resistance
Wall Considerations
- Cement board or Schluter-KERDI board as tile backer in wet areas (not standard drywall)
- Niche placement requires coordination with stud layout and waterproofing before framing closes
- Full-height tile to ceiling creates a cleaner, more contemporary look and eliminates painted drywall that absorbs moisture
- Feature walls with book-matched marble, fluted tile, or large-format slab panels are planned and ordered well ahead of installation
NYC Permits and Approvals: What You Actually Need
Navigating the approval process is often what separates a smooth renovation from one that stalls for weeks or months. In New York City, bathroom renovations can require two separate layers of approval: your building’s board, and the Department of Buildings.
NYC APARTMENT RENOVATION 101 – EVERYTHING YOU NEED TO KNOW
DOB Permits for Bathroom Renovations
Not every bathroom renovation requires a DOB permit — but many do. The general rule is that any work involving changes to the plumbing system beyond simple fixture replacement requires a licensed plumber to pull a plumbing permit. This includes:
- Relocating or adding fixtures
- Modifying drain or vent lines
- Adding a washing machine connection
- Any work that touches the branch lines back to building riser
Structural changes (removing walls, changing openings) and significant electrical work require their own permits as well. In some cases, an Alteration Type 2 (ALT2) filing is required when multiple permitted trades are involved. Your design-build contractor should be pulling the appropriate permits — work done without required permits can create problems at resale and with your building.
Co-op and Condo Board Approvals
For co-op and condo apartments, board approval is almost always required for bathroom renovations. The process typically involves:
- Submitting a complete alteration agreement package — architectural drawings, scope of work, contractor insurance, DOB permit applications
- Board review, which can take two to six weeks depending on the building
- Managing agent sign-off on logistics: work hours, elevator protection, common area protection
- Building engineer review in some cases, particularly for structural work or wet zone expansion
The quality of your submission matters. A complete, well-organized package with clear drawings gets approved faster than an incomplete one that comes back with questions. A design-build team like Star Renovation NY that handles the submission in-house — rather than requiring you to coordinate between a separate architect and contractor — keeps that process moving efficiently.
Landmark and Pre-War Buildings
If your building is a landmark or in a historic district, any work affecting the building exterior (including new exhaust penetrations through the facade) requires Landmarks Preservation Commission (LPC) review in addition to DOB. Interior work generally doesn’t trigger LPC, but it’s worth confirming with your contractor before assuming a new vent penetration is straightforward.
What Does a Bathroom Gut Renovation Actually Cost in NYC?
Cost is the question everyone wants answered upfront, and it’s also the one that varies most based on scope, building type, and finish level. Here’s an honest breakdown for Manhattan and Brooklyn.
Typical Cost Ranges
- Standard bathroom gut renovation (no layout change, new plumbing branches, new tile and fixtures): $45,000 – $65,000
- Mid-size bath with layout reconfiguration, walk-in shower, luxury finishes: $65,000 – $85,000
- Primary bath gut renovation with custom tile, stone, and full reconfiguration: $100,000 – $150,000+
- Adding washer/dryer to bathroom (where permitted): $8,000 – $20,000 depending on existing infrastructure
What Drives Cost Up
- Significant plumbing rerouting, especially if drain lines need to run through a slab
- Premium stone (marble, quartzite, travertine) versus porcelain or ceramic
- Custom millwork — built-in vanities, medicine cabinets, storage towers
- Heated floors
- Water proofing membrane on floors and walls
- Complex glass enclosures with custom hardware
- Board approval delays that extend the project timeline
- Permit expediting fees in complex DOB filings
What Drives Cost Down
- Keeping the layout largely unchanged — no fixture relocation
- Using porcelain and ceramic tile (looks like subway, installs faster, costs less)
- Standard prefab vanity with a stone top rather than fully custom millwork
- Pre-planning material selections to avoid change orders mid-project
One thing that consistently keeps costs under control is thorough pre-construction planning. Surprises during construction are expensive. AT Star Renovation NY we surveys the space, maps the plumbing, and finalizes all material selections before demo begins will spend less time on change orders and more time executing.

How Star Renovations NY Manages It All
At Star Renovations NY, we handle bathroom renovations in Manhattan and Brooklyn as full-scope, design-build projects. That means one team manages everything: the design, the drawings, the permits, the board submissions, the trades, and the finish work. You have one point of contact and one timeline, not a handoff between a designer, an architect of record, and a contractor who’ve never worked together before.
What That Looks Like in Practice
- Initial site visit to survey existing site conditions and plumbing risers, structural conditions, and wet zone limits before any design is proposed
- Architectural drawings and permit filings prepared in-house by our team
- Board submission package coordinated with managing agent timeline
- Project Center system for real-time updates, decisions, and documentation throughout construction
- Dedicated project manager and project coordinator who manage daily logistics, materials, and subcontractor scheduling https://srny.nyc/about-us
- Full construction from demo through final punch list, including protection of common areas and elevators
We work with homeowners who want their bathroom to function better, feel better, and hold its value for decades — not just look good in photos. That requires getting the infrastructure right, not just the tile selection